Lighting is one of the biggest factors that separates ordinary photos and videos from professional-looking ones. Even if you have an expensive camera, poor lighting can make your images look flat, dull, or unappealing. On the other hand, the right lighting technique can transform a simple scene into something eye-catching and cinematic.
One of the most trusted lighting methods used by photographers, filmmakers, portrait artists, and content creators is 45 degree angle lighting. This technique has been a professional favorite for decades because it creates natural-looking shadows, enhances facial features, and adds depth without making the subject appear harsh or overly dramatic.
Whether you’re photographing portraits, recording YouTube videos, creating product photography, shooting fashion content, or simply improving your smartphone photos, understanding how to use 45 degree angle lighting can dramatically improve your results.
This guide explains everything you need to know about mastering this lighting technique like a professional, from basic concepts to advanced tips that anyone can apply.
ALSO READ: Everything You Need To Know About Virgin HD
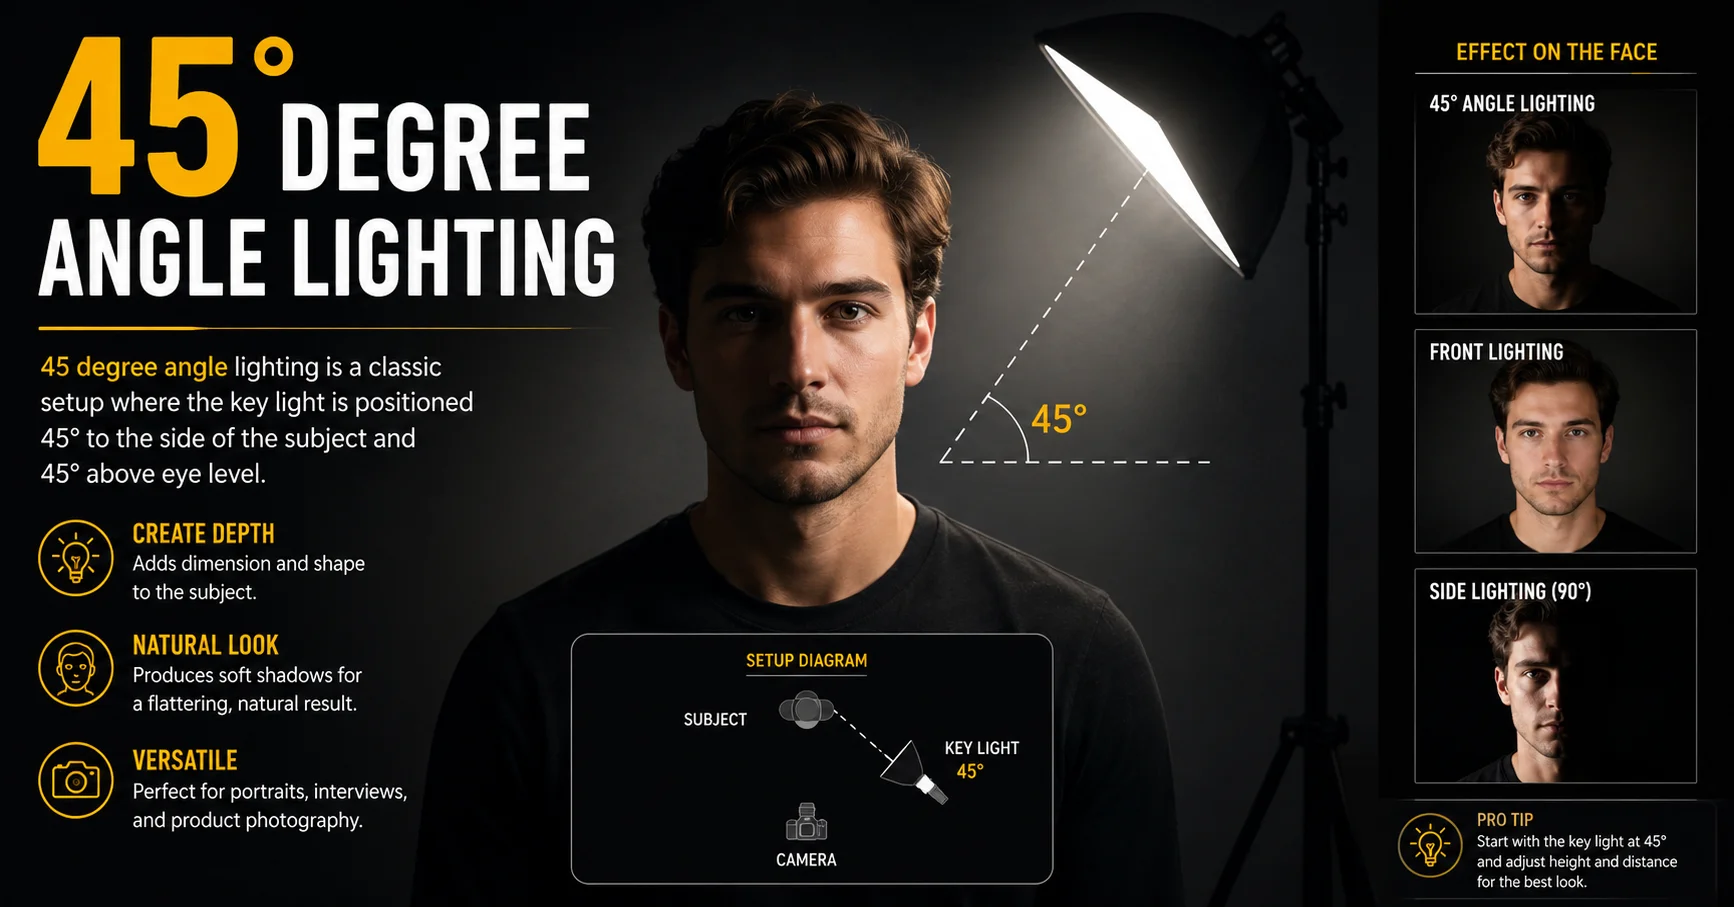
What Is 45 Degree Angle Lighting?
45 degree angle lighting refers to placing your main light source approximately 45 degrees to one side of your subject and usually slightly above eye level.
Instead of shining directly in front of the subject, the light comes from the side at an angle, creating gentle shadows across the face or object.
Imagine standing directly in front of someone.
- Move your light about halfway between directly in front and directly beside them.
- Raise it slightly higher than their eyes.
- Tilt it downward toward the face.
This simple adjustment creates a much more flattering appearance than flat front lighting.
Why Professionals Prefer 45 Degree Angle Lighting
There are many lighting setups available, but professionals repeatedly return to this one because it offers the perfect balance between brightness and shadow.
Benefits include:
- Creates natural facial depth
- Adds dimension to photos
- Makes subjects look more three-dimensional
- Highlights textures beautifully
- Produces soft, attractive shadows
- Works with both artificial and natural light
- Easy for beginners to learn
- Suitable for almost every photography style
Rather than making everything appear equally bright, the lighting creates contrast that makes images feel alive.
Understanding The Science Behind The Technique
When light strikes an object from directly in front, almost every surface receives the same amount of illumination.
The result often looks flat because there are very few visible shadows.
When light moves to a 45 degree angle lighting, several things happen naturally:
- One side receives stronger illumination.
- The opposite side falls into softer shadow.
- Curves become more visible.
- Texture becomes noticeable.
- The subject gains visual depth.
Our eyes naturally interpret these shadows as three-dimensional information.
That’s why professionally lit portraits appear much more realistic.
The Perfect Placement
Although every situation is different, a good starting position is surprisingly simple.
Horizontal Position
Place the key light:
- About 45 degree angle lighting to the left or right
- Facing the subject
- Not directly beside them
Imagine drawing a diagonal line from the light toward the person’s nose.
Vertical Position
Raise the light slightly above eye level.
Usually:
- 20–45 degrees above the subject
- Tilt downward toward the face
This positioning creates natural shadows beneath the cheekbones and chin without looking unnatural.
Distance
The closer the light:
- Softer appearance
- Less harsh shadows
- More flattering portraits
The farther away:
- Stronger shadows
- Higher contrast
- More dramatic mood
Many portrait photographers start with the light about 3–6 feet from the subject before making adjustments.
Essential Equipment You Can Use
The great thing about 45 degree angle lighting is that it works with almost any light source.
Natural Window Light
This is one of the easiest options.
Simply position your subject near a window.
Turn them about 45 degree angle lighting toward the incoming light.
The window becomes a giant soft light source.
Cloudy days often produce especially beautiful results because the clouds naturally diffuse sunlight.
Softboxes
Softboxes are extremely popular because they spread light evenly.
Advantages include:
- Soft illumination
- Reduced harsh shadows
- Professional appearance
- Excellent for portraits
- Ideal for video recording
LED Panels
LED lights have become favorites among creators because they offer:
- Adjustable brightness
- Adjustable color temperature
- Low heat
- Continuous lighting
- Easy portability
These lights are perfect for YouTube creators, streamers, and content producers.
Ring Lights
Although ring lights are generally placed directly in front of the subject, they can still be used with the 45 degree angle lighting principle.
Many photographers simply move the ring light slightly off-center to create more depth.
Speedlights
Professional photographers often use speedlights with umbrellas or softboxes.
This combination creates portable studio-quality lighting almost anywhere.
Choosing The Right Side
Should the light come from the left or right?
There isn’t one correct answer.
Instead, consider:
- Hair direction
- Facial features
- Background composition
- Existing light sources
- Desired mood
Many photographers test both sides before deciding.
Sometimes one side simply looks more flattering.
Using Natural Light Effectively
Window lighting is free and incredibly powerful.
For the best results:
- Turn the subject 45 degree angle lighting toward the window.
- Keep the window beside them.
- Avoid direct midday sunlight.
- Use white curtains to soften harsh light.
- Experiment with distance from the window.
Moving just one or two feet closer can completely change the look.
Common Portrait Lighting Patterns
45 degree angle lighting serves as the foundation for several classic portrait styles.
Rembrandt Lighting
Named after the famous painter, this style creates a small triangle of light beneath the eye on the shadow side of the face.
It produces:
- Rich contrast
- Dramatic mood
- Artistic appearance
Loop Lighting
This is one of the most popular portrait setups.
The nose casts a small shadow that loops toward the cheek without touching it.
Loop lighting is flattering for most face shapes.
Butterfly Lighting
Although this technique places the light more centrally, photographers often adjust slightly toward 45 degree angle lighting to soften the effect.
Butterfly lighting is especially popular in beauty and fashion photography because it emphasizes cheekbones and smooth skin.
Split Lighting
Moving the light farther toward the side eventually creates split lighting, where half of the face is illuminated while the other half remains in shadow.
This style creates a dramatic, cinematic effect.
Camera Settings That Complement 45 degree angle lighting
Even excellent lighting benefits from proper camera settings.
For portraits, consider starting with:
- ISO: 100–400
- Aperture: f/1.8 to f/4
- Shutter Speed: 1/125 or faster
- White Balance matched to the light source
These settings help preserve sharpness while making the lighting appear natural.
Mistakes Beginners Often Make
Many new photographers struggle with lighting simply because of a few common mistakes.
Light Too High
If the light sits far above the subject, shadows become deep and unflattering.
Light Too Low
Lighting from below creates unnatural horror-style shadows.
Light Too Far to the Side
Moving beyond roughly 45 degrees often causes excessive facial shadow.
Light Too Close Without Diffusion
A very bright undiffused light can produce harsh skin textures and uncomfortable highlights.
Ignoring the Background
Even perfect subject lighting won’t save an image if the background is distracting or unevenly lit.
Advanced Techniques to Improve Your 45 Degree Angle Lighting
Once you become comfortable with the basic setup, you can make small adjustments that create noticeably different results. Professional photographers rarely leave their light in exactly one position. Instead, they fine-tune the angle, height, and distance based on the subject.
Feather the Light
Instead of pointing the center of the light directly at your subject, slightly rotate it so the softer edge of the light falls across the face. This creates smoother transitions between highlights and shadows, making skin appear more natural.
Adjust the Height
Raising or lowering the light by just a few inches can dramatically change the look.
- Slightly higher light creates stronger cheekbone definition.
- Lower light softens facial features.
- Experiment until the shadows look balanced.
Change the Distance
Moving the light closer produces softer, more flattering light because the light source appears larger relative to the subject.
Moving it farther away increases contrast and creates a more dramatic appearance.
Using Reflectors For Balanced Lighting
One of the easiest ways to improve 45 degree angle lighting is by adding a reflector opposite your main light.
A reflector bounces light back into the shadow side of the subject, reducing harsh contrast while keeping the image three-dimensional.
Common reflector colors include:
White Reflector
- Soft, natural fill
- Ideal for portraits
- Maintains realistic skin tones
Silver Reflector
- Brighter reflections
- Adds more contrast
- Great for fashion photography
Gold Reflector
- Adds warmth
- Perfect during outdoor shoots
- Creates a sun-kissed look
Even a white foam board can work surprisingly well as an inexpensive reflector.
Indoor 45 Degree Angle Lighting Setup
Indoor photography gives you complete control over your lighting.
A simple setup includes:
- One key light positioned at a 45 degree angle
- A reflector opposite the light
- Neutral background
- Camera directly facing the subject
If available, use blackout curtains to block unwanted sunlight so your lighting remains consistent.
Outdoor 45 Degree Angle Lighting
Natural light changes throughout the day, but the same principles still apply.
Golden Hour
The hour after sunrise and before sunset offers soft, warm light that works beautifully with 45 degree positioning.
Simply have your subject turn slightly toward the sunlight rather than facing it directly.
Cloudy Days
Cloud cover acts like a giant diffuser, producing soft shadows that are excellent for portraits.
Bright Midday Sun
Direct overhead sunlight creates harsh shadows.
To improve the lighting:
- Move into open shade.
- Position the sun about 45 degrees from the subject.
- Use a reflector to brighten the shadow side.
Using 45 Degree Angle Lighting For Product Photography
Products also benefit from angled lighting.
Instead of lighting objects directly from the front, position your light around 45 degrees to reveal texture and shape.
This works especially well for:
- Jewelry
- Watches
- Electronics
- Cosmetics
- Food photography
- Shoes
- Fashion accessories
Adding a second reflector opposite the light helps eliminate overly dark shadows while maintaining depth.
Fashion Photography Tips
Fashion photographers rely heavily on 45 degree angle lighting because it highlights clothing textures and complements body shape.
To achieve professional results:
- Use a large softbox for even illumination.
- Position the model slightly toward the light.
- Keep the background clean.
- Use longer focal lengths for flattering proportions.
- Watch for wrinkles caused by strong side shadows.
This lighting style works particularly well with textured fabrics like denim, leather, linen, velvet, and knitwear.
Video Lighting With The 45 Degree Rule
Content creators, streamers, and YouTubers often use this technique because it creates a polished, cinematic look.
A basic three-point lighting setup includes:
Key Light
Placed at approximately 45 degrees.
Fill Light
Placed on the opposite side with lower brightness to soften shadows.
Back Light
Positioned behind the subject to separate them from the background.
This setup produces professional-looking videos even in a home studio.
Smartphone Photography Tips
You don’t need expensive equipment to use 45 degree angle lighting.
If you’re using a smartphone:
- Stand near a large window.
- Face slightly toward the light.
- Avoid overhead room lights.
- Tap to focus on the eyes.
- Lower exposure slightly if highlights appear too bright.
Modern smartphone cameras respond extremely well to good lighting.
Best Light Modifiers
Professional photographers often use modifiers to control the quality of light.
Softbox
Ideal for portraits and videos because it creates soft, even illumination.
Umbrella
Affordable and easy to set up.
Beauty Dish
Popular for fashion and beauty photography due to its crisp yet flattering light.
Diffuser
Softens harsh light while preserving brightness.
Grid
Controls light spread and reduces unwanted spill onto the background.
Troubleshooting Common Lighting Problems
Even with the correct angle, you may encounter a few issues.
Shadows Are Too Dark
Possible solutions:
- Move the light closer.
- Add a reflector.
- Increase fill light.
Face Looks Flat
Try moving the light farther to the side until subtle shadows appear.
Harsh Skin Texture
Use a larger softbox or diffuser to soften the light.
Background Too Bright
Increase the distance between the subject and background or reduce background lighting.
Uneven Lighting
Check that the light is aimed correctly and positioned at a consistent height.
Practice Exercises
Improving your lighting skills takes practice. Try these simple exercises:
Exercise 1
Photograph the same person with:
- Front lighting
- 45 degree lighting
- Side lighting
Compare the differences in depth and shadow.
Exercise 2
Move your light closer and farther away while keeping the camera in the same position. Notice how the softness changes.
Exercise 3
Take portraits using:
- No reflector
- White reflector
- Silver reflector
Study how each affects the shadow side of the face.
Professional Tips For Better Results
Experienced photographers follow a few habits that consistently improve their work.
- Always focus on the eyes in portraits.
- Keep catchlights visible in the eyes for a lively appearance.
- Avoid placing the light too high.
- Watch how shadows fall on the nose and chin.
- Use diffused light whenever possible.
- Experiment with small adjustments rather than large changes.
- Review your images after each lighting adjustment.
- Remember that every face is unique, so don’t rely on one setup for everyone.
The more you practice, the more naturally you’ll recognize the best lighting position for each subject.
Conclusion
Mastering 45 degree angle lighting is one of the smartest investments you can make in your photography or videography skills. This simple yet highly effective technique creates natural depth, enhances facial features, and produces professional-looking results without requiring expensive equipment.
Whether you’re capturing portraits, filming videos, photographing products, or creating content with a smartphone, understanding how light interacts with your subject will dramatically improve the quality of your work. Start with a basic 45 degree setup, experiment with light height, distance, and reflectors, and continue practicing in different environments.
With time and experience, adjusting your lighting will become second nature, allowing you to create consistently polished, visually appealing images that stand out.
FAQs
What is 45 degree angle lighting?
45 degree angle lighting is a technique where the main light source is positioned about 45 degrees to one side of the subject and slightly above eye level to create natural-looking depth and flattering shadows.
Is 45 degree lighting good for beginners?
Yes. It is one of the easiest and most effective lighting techniques to learn because it works well for portraits, videos, and product photography.
Can I use natural sunlight for 45 degree angle lighting?
Absolutely. A large window or soft outdoor sunlight can provide excellent 45 degree lighting without the need for studio equipment.
Do I need expensive lighting equipment?
No. You can achieve professional-looking results with window light, affordable LED panels, or a simple softbox combined with a reflector.
Why do photographers prefer 45 degree angle lighting?
Photographers prefer it because it creates balanced highlights and shadows, adds depth, flatters facial features, and gives photos a clean, professional appearance.
ALSO READ: Mini iPod Clip: Everything You Need To Know
Evelyn is a technology writer and researcher specializing in software development, artificial intelligence, and emerging digital systems. With hands-on experience in building and analyzing modern tech solutions, she focuses on translating complex technical concepts into clear, practical insights for developers, entrepreneurs, and curious readers.